

How to Maintain Teak Outdoor Furniture
Table of Contents
- Understanding Teak Wood Properties and Why Maintenance Matters
- What You'll Need: Tools and Materials for Teak Care
- How to Clean Teak Furniture Without Damaging It
- Removing Mold from Teak and Preventing Future Growth
- Teak Oil vs. Sealer: Choosing the Right Protective Finish
- Teak Furniture Maintenance Schedule by Season
- Restoring Weathered Gray Teak and Addressing Stains
- Common Mistakes to Avoid When Caring for Teak
- Frequently Asked Questions
Last Updated: September 1, 2026
Understanding Teak Wood Properties and Why Maintenance Matters
Teak is one of the most durable hardwoods available for outdoor furniture, prized for its natural oils and tight grain structure that resist rot, insects, and weathering. The wood contains silica and natural oils that provide inherent protection, but these properties diminish over time without intentional maintenance. When you neglect teak outdoor furniture, the protective oils leach away, leaving the wood vulnerable to moisture absorption and UV damage. This is why learning how to maintain teak outdoor furniture isn't optional, it's what separates a piece that looks beautiful for decades from one that deteriorates within a few years.
The natural gray patina that develops on teak is simply oxidation, not damage. However, this weathered appearance can mask underlying moisture problems that eventually compromise structural integrity. The key to longevity is striking a balance: allowing teak to develop its natural character while actively preventing moisture and mold infiltration.
At Spirit of Willow, we understand that outdoor furniture represents a significant investment in your home's aesthetic and functionality. Our curated collection of teak pieces is selected specifically for their quality and durability, but even the finest teak requires consistent care to maintain its beauty and structural integrity over time.
What You'll Need: Tools and Materials for Teak Care
Before you begin any maintenance routine, gather the right tools and materials. Using improper equipment can actually damage teak rather than protect it.
Essential cleaning supplies:
- Soft-bristle brush (natural or synthetic, never wire)
- Mild dish soap or specialized teak cleaner
- Lint-free cloths (microfiber works well)
- Bucket for water
- Garden hose with adjustable spray nozzle
For deeper restoration:
- Medium-grit sandpaper (120-150 grit for light restoration)
- Teak oil or teak sealer
- Applicator brush or cloth for oils and sealers
- Protective gloves and eye protection
What to avoid purchasing: Never buy harsh chemical cleaners, pressure washers, or steel wool, these damage the wood grain and create microscopic fractures that invite moisture penetration. Similarly, avoid generic wood stains or varnishes designed for interior use; they won't hold up to outdoor UV exposure.
The investment in quality tools is minimal compared to the cost of replacing weathered or damaged furniture.
How to Clean Teak Furniture Without Damaging It
Cleaning teak properly removes surface grime and day-to-day dirt without stripping the wood or opening it to moisture damage.
Step 1: Prepare the furniture and workspace [Time: 5 minutes] Move furniture to a shaded area if possible. Direct sunlight can cause cleaning solutions to dry too quickly, leaving residue.
Step 2: Brush away loose debris [Time: 5 minutes] Use your soft-bristle brush in the direction of the wood grain to remove dust, pollen, and loose dirt. Pay special attention to crevices and areas where water pools.
Step 3: Mix your cleaning solution [Time: 3 minutes] Combine mild dish soap with warm water in a bucket, using approximately one tablespoon of soap per gallon of water (the CDC). If using a specialized teak cleaner, follow the manufacturer's dilution instructions.
Step 4: Scrub gently with the grain [Time: 15-20 minutes] Dip your soft-bristle brush into the soapy water and scrub in the direction of the wood grain. Use moderate pressure, firm enough to remove grime, but not so hard that you're abrading the surface. Work in sections, completing one area before moving to the next.
Step 5: Rinse thoroughly with clean water [Time: 10 minutes] Use your garden hose to rinse away all soap residue. Soap left on the surface can trap moisture and cause discoloration. Rinse multiple times if necessary.
Step 6: Dry completely [Time: 30 minutes to 2 hours, depending on humidity] Use lint-free cloths to wipe down all surfaces, paying special attention to joints and crevices where water accumulates. Allow the piece to air-dry completely in shade before applying any protective finish.
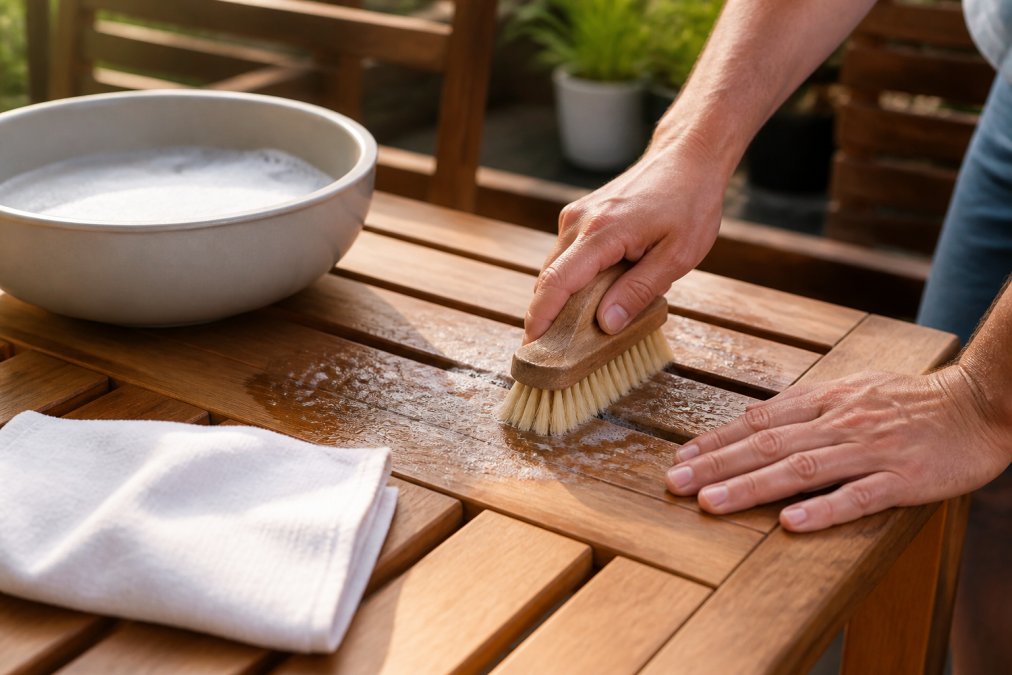
Expected result: The wood should look noticeably cleaner, with the natural grain more visible.
Removing Mold from Teak and Preventing Future Growth
Mold appears as black or dark green spots on teak, typically in areas with poor air circulation or high humidity. Unlike weathering, which is harmless discoloration, mold is a biological growth that damages wood fibers and indicates moisture problems.
Identifying mold versus weathering: Weathered teak develops an even gray patina across the entire surface. Mold appears as distinct dark spots or patches, often concentrated in corners, under cushions, or where water pools. If unsure, apply diluted bleach to a test area, mold will lighten or disappear within minutes, while weathering won't change.
Removing active mold: Mix one part white vinegar with three parts water, or use a specialized mold-removal product designed for wood (the CDC). Apply the solution with a soft brush, scrubbing gently. Allow it to sit for 10-15 minutes, then scrub again and rinse thoroughly with clean water.
Preventing future mold growth: Space furniture pieces to allow air circulation around all sides. Remove cushions and covers regularly to allow the wood to dry completely. In humid climates, consider applying a teak sealer, which creates a moisture barrier and significantly reduces mold risk.
Inspect your furniture monthly, especially during humid seasons, and address any spots immediately to prevent the mold from spreading deeper into the wood.
Teak Oil vs. Sealer: Choosing the Right Protective Finish
The choice between teak oil and teak sealer fundamentally changes how your furniture weathers and how much maintenance it requires.
Teak oil characteristics: Teak oil is a penetrating finish that soaks into the wood grain, nourishing the fibers and restoring the warm, natural color. It doesn't create a surface barrier and needs refreshing every 3-6 months, depending on climate and sun exposure. The advantage is ease of reapplication; the disadvantage is more frequent maintenance.
Teak sealer characteristics: Teak sealer creates a protective surface layer that resists moisture and UV damage. A single application typically lasts 12-18 months, making it lower-maintenance than oil. Sealers prevent the wood from developing the natural gray patina, maintaining the warm wood tone longer. The trade-off is that sealers eventually wear through and require complete reapplication.
Choosing between them: If you want to maintain teak's warm, natural appearance and don't mind regular maintenance, choose oil. If you prefer a low-maintenance approach and want to prevent weathering, choose sealer. In high-humidity regions with significant mold risk, sealer provides better moisture protection. In drier climates, oil is often sufficient.
Many experienced teak owners use both: applying sealer initially to establish a moisture barrier, then switching to oil maintenance once the piece is established.
Teak Furniture Maintenance Schedule by Season
A seasonal maintenance schedule prevents problems from developing and keeps your furniture in optimal condition year-round.
Spring (March-May): After winter, inspect all pieces for mold, mildew, or moisture damage. Clean thoroughly using the soft-brush method. If you applied sealer in the fall, check for wear and reapply if necessary.
Summer (June-August): Monthly cleaning removes pollen, dust, and salt spray. Check cushions and covers for mold growth and allow them to dry completely after rain. If using oil, a light reapplication mid-summer extends protection.
Fall (September-November): Clean furniture thoroughly before winter storage. If using sealer, apply a fresh coat in early fall to provide maximum protection through winter. Remove any accumulated leaves or debris that could trap moisture.
Winter (December-February): In cold climates, brush off heavy snow promptly and ensure water drains away from the furniture. In milder climates, check regularly for mold and ensure air circulation around pieces.
Adjust timing based on your local weather patterns. The principle remains consistent: inspect regularly, clean when needed, and apply protective finishes before seasons that stress the wood most.
Restoring Weathered Gray Teak and Addressing Stains
Weathered teak develops a silver-gray patina over time. This is natural and harmless, but many homeowners prefer to restore the warm, honey-brown tone.
Understanding the weathering process: The gray color comes from oxidation of the wood surface. UV exposure and moisture accelerate this process. The weathered layer is typically only 1-2 millimeters thick, so restoration doesn't require removing significant wood (peer-reviewed research).
Light restoration with sanding: For light weathering, use 120-150 grit sandpaper to gently sand the surface in the direction of the grain. Sand lightly to remove the oxidized layer, not to reshape the furniture. After sanding, clean away all dust with a damp cloth and allow the wood to dry completely. You can then apply teak oil or sealer to protect the newly exposed surface.
Addressing specific stains: Water stains often disappear with proper cleaning and drying. Rust stains from metal hardware require a specialized rust remover or a paste of baking soda and lemon juice, applied directly to the stain. Allow it to sit for 15-20 minutes, then scrub gently and rinse thoroughly. Grease or food stains respond to degreaser applied with a soft brush.
When to seek professional restoration: If weathering is severe, structural damage is present, or stains won't respond to home treatment, professional restoration may be necessary.
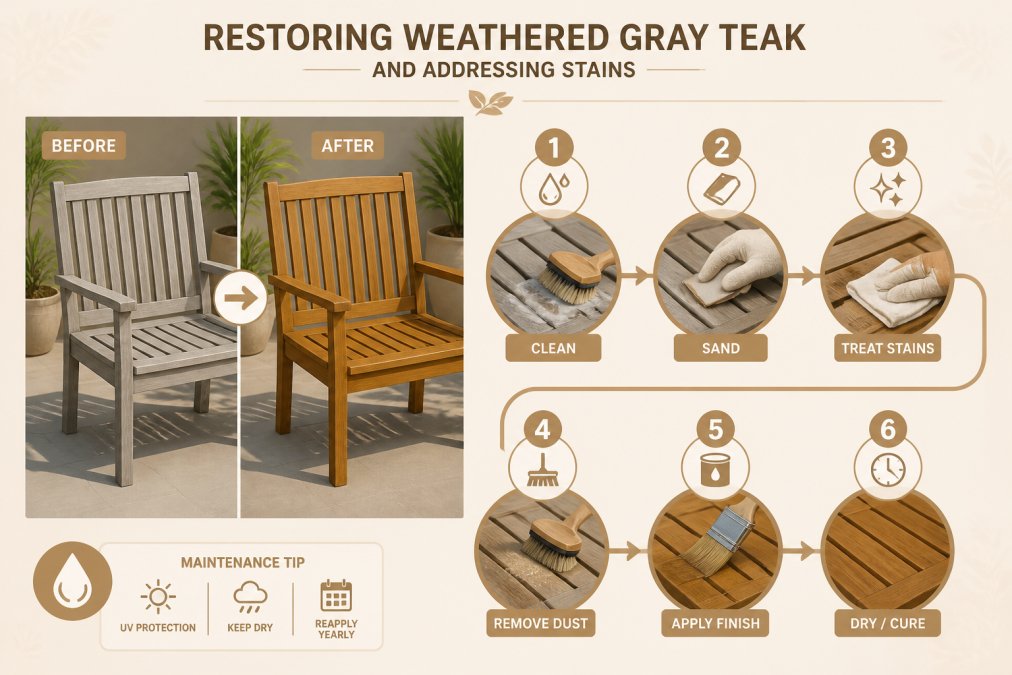
Restoration is an investment in time and sometimes money, but it can extend the life of beloved pieces significantly.
Common Mistakes to Avoid When Caring for Teak
Learning what NOT to do is as important as knowing what to do.
Mistake 1: Using pressure washers Pressure forces water deep into the wood grain, causing rot, splitting, and accelerated deterioration. The damage is often irreversible. Always use a garden hose with gentle spray or hand-washing methods instead.
Mistake 2: Applying the wrong finish Interior wood stains, varnishes, or polyurethane don't hold up to outdoor UV exposure and moisture. Always use products specifically formulated for outdoor teak.
Mistake 3: Ignoring mold early Small mold spots are easy to treat. Extensive mold growth indicates deep moisture problems and requires professional intervention. Monthly inspection catches problems while they're manageable.
Mistake 4: Over-treating with oil or sealer More product doesn't mean better protection. Excessive oil creates a sticky, dust-attracting surface. Over-sealed teak can trap moisture and cause the finish to peel. Follow manufacturer recommendations.
Mistake 5: Storing furniture improperly If storing teak indoors during off-season, ensure the space is dry and well-ventilated. Outdoor storage should include protective covers that allow air circulation, not plastic tarps that trap moisture.
Mistake 6: Neglecting hardware and fasteners Metal hardware corrodes and can stain the wood around it. Inspect regularly and treat rust spots immediately. Consider upgrading to stainless steel hardware.
Mistake 7: Skipping the soft-bristle brush requirement Wire brushes and abrasive scrubbing damage the wood grain permanently. This is the difference between a piece that improves with age and one that looks progressively worn.
Maintaining teak outdoor furniture transforms it from a seasonal purchase into a lasting investment in your home's outdoor living experience. The process isn't complicated, regular cleaning, appropriate protective finishes, and seasonal attention keep pieces beautiful for decades. At Spirit of Willow, our carefully curated teak furniture is built to last, and with the maintenance practices outlined here, your pieces will develop character and patina that grows more beautiful over time. Begin with a thorough cleaning this month, select either teak oil or sealer based on your climate and preferences, and establish a simple seasonal routine. Your outdoor space deserves furniture that reflects the care you invest in it.
Frequently Asked Questions
Q: Is it better to oil or seal teak outdoor furniture?
A: Both teak oil and sealer protect your furniture, but they work differently. Teak oil penetrates the wood grain and enhances the natural color, requiring reapplication every 3-6 months. Sealer creates a protective surface barrier and lasts longer between applications (typically 12-18 months). Choose teak oil if you want to maintain the wood's warm appearance; choose sealer if you prefer a longer-lasting, hands-off protective finish. Many owners use both: sealer as the base layer for durability, then teak oil for color maintenance.
Q: Can I use mild dish soap to clean teak furniture?
A: Yes, mild dish soap is safe for cleaning teak when diluted with water. Mix a few drops of mild soap with warm water, apply with a soft-bristle brush, and rinse thoroughly with fresh water. Avoid harsh detergents or abrasive scrubbing, which can damage the wood grain. This gentle cleaning method removes day-to-day grime and is ideal for regular maintenance. For stubborn stains or mildew, consider a specialized teak cleaner designed to work without harming the wood's natural properties.
Q: What should I do about the gray patina that forms on teak?
A: The gray weathered appearance is a natural patina that forms when teak is exposed to UV light and moisture. If you prefer the original warm color, you can restore it by sanding with fine-grit sandpaper (120-150 grit) or applying a teak restorer product. However, the patina doesn't indicate damage, it's simply how teak ages outdoors. Many homeowners embrace this natural look as part of the wood's character. If you choose to restore the color, plan for this maintenance every 1-2 years depending on climate and sun exposure.
Q: Do I need to cover teak furniture during winter?
A: Teak is naturally rot-resistant and durable in most climates, so covering is optional. However, a protective cover reduces moisture exposure, prevents mildew growth, and minimizes seasonal staining in harsh winter conditions. If you live in an area with heavy snow, ice, or prolonged moisture, a cover extends the time between deep cleanings. In milder climates, leaving furniture uncovered and performing seasonal maintenance is sufficient. If you do cover furniture, ensure airflow underneath to prevent moisture trapping.
This article was written using GrandRanker